How To Create A Password-Protected (Encrypted) Disk Image In Mac OS X?

Learn how to use Disk Utility to create an encrypted disk image in Mac OS X. The Mac operating has got this inbuilt feature of creating high security encrypted disk image. An encrypted disk image works just like a regular disk image but requires a password to open and become available ("mount"). You can move files to or from an encrypted disk image as easily as you can from a non-encrypted disk image. This inbuilt feature helps you to keep your personal data like photos, videos, important office documents safely without using any Third party software.Encryption provides confidence that your backups are safe.
So What is Disk Encryption All About?
Disk encryption is a technology which protects information by converting it into unreadable code that cannot be deciphered easily by unauthorized people. Disk encryption uses disk encryption software or hardware to encrypt every bit of data that goes on a disk or disk volume.
Five Highly Useful Security Articles:
These are few articles related to security which may be useful for you. So, please check this out- Learn How to create Strong Password which will take years to crack
- How to save Passwords using Keepass?
- Password Protect a Microsoft Word 2011 Document
- KeyScrambler Personal:Encrypts Keystokes As You Type
- 5 Most Wanted Tips For Online Security
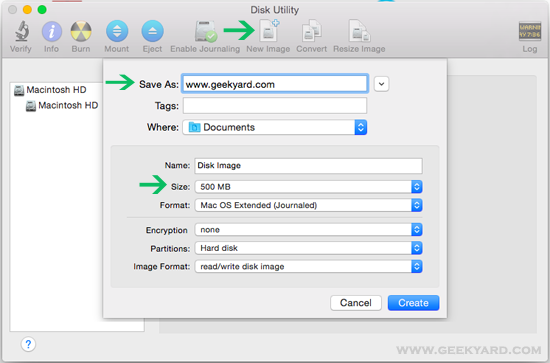
Follow these steps to create an encrypted disk image:
- Open Disk Utility (Goto –>Applications–>Utilities).
- Click the New Image button, or choose File > New > Blank Disk Image.
- Type a name in the Save As field. This name will be used for the disk image (.dmg) file.
- Change the save destination if you wish.
- Select a size for the disk image file from the Size pop-up menu.(Here I have selected 500MB).
- Choose a different volume format if you don't want to use the default Mac OS X Extended (Journaled).
- Choose an image format. Here I have selected "read/write disk image" choice.
- Choose 128-bit AES encryption (and/or 256-bit AES in Mac OS X v10.5 or later) from the Encryption pop-up menu to encrypt the image's contents with a password. If you don't choose an encryption, your new image won't be encrypted.
- Click the Create button.
- Enter and verify a good password in the dialog window that appears. This password will be saved in your keychain by default, or you can deselect "Remember password (add to keychain)" if you don't want it saved. You can store the password in the keychain for convenience.
- Click OK.

0 Comments:
Post a Comment
FOLLOW US ON FACEBOOK: https://www.facebook.com/unitechsity
:::. .:::
:::. .:::
Share or Like this Post - if you Find it Informative and Cool…
Thanks. Never miss any of my future post
CLICK HERE TO SUBSCRIBE
http://feedburner.google.com/fb/a/mailverify?uri=unitechsity
Once entered, you will have to check your inbox for a confirmation email containing a confirmation link. Once you VERIFY your email by clicking on the confirmation link in the message, you will never miss any future articles.
.
Note: only a member of this blog may post a comment.
Subscribe to Post Comments [Atom]
<< Home