Monday, December 04, 2017

How to scan a document on iPhone and iPad natively

iOS 11 comes as big software upgrade for all Apple users. Apart from the convenient dock feature and the revamped control centre, other features like Scan come in really handy. With this new release, users will no longer have to download third party scanning apps.

With Apple's Notes App, this new feature has made scanning documents easier than ever.

Here's how you can do it..

1) Update your device with the latest version of iOS 11.

2) Once the update is done, open the Notes app.

3) Tap on the 'pen' icon located on the top right corner.

4) As soon as you tap on it, your keyboard will appear

5) Tap on the '+' sign on the top bar of your keyboard

6) A drop down menu will appear with 'Scan Documents' right on top

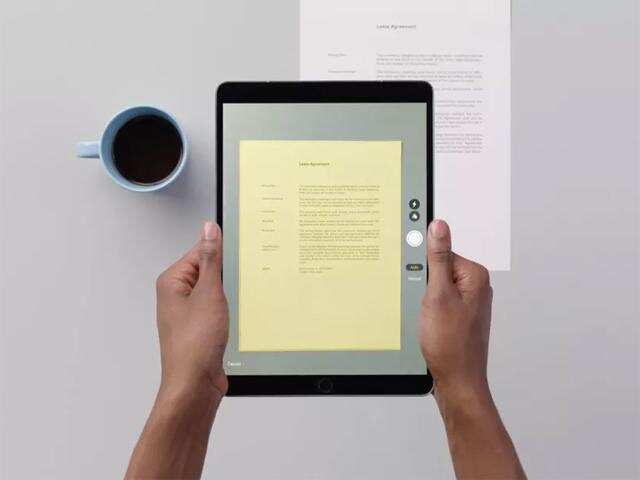
7) Tap on the 'Scan Documents' and point the camera towards the document you want to scan

8) Once you've framed the document correctly, click on the camera shutter button

9) After you've scanned the document, you can preview the document you have just scanned


10) Here you will get an option to crop the document accordingly, if you're still not pleased with the results, click on the 'retake' button or click on 'done'.


11) The best part about this feature is that, no matter in which angle you've scanned the document, the final result will always be right angled. It'll be framed perfectly horizontally and vertically.


Note: If you want to save each document as a different file, make sure you open a new note pad every time you want to scan a new document. Otherwise it'll be saved as one PDF file.


We tried using this feature and it is better than most of the third-party scanning apps. The image quality is great and you won't even be able to make out the difference between documents scanned on a proper scanner or documents scanned on your iPhone or an iPad.

Virus-free. www.avast.com

Labels: , ,

How to use the Poll feature on Instagram stories

NEW DELHI: Photo sharing platform Instagram added a new feature to its Stories recently. This new feature is nothing but an interactive poll sticker that lets you ask a question and see results from your friends and followers as they vote.

"Whether you're trying to plan tomorrow's outfit, choosing which class to take or figuring out where to go for dinner, now it's easy to share a two-option poll right in your story," said the company in the blog post. It is noteworthy that these polls disappear after 24 hours as these are part of Stories.

Here is what you need to do to use this feature:

1) Open Instagram on your device.

2) Tap the Home tab at the bottom.

3) Tap your Profile icon in the top-left corner or swipe right to create a new Story.

4) Select an image to add to your story either by capturing or selecting from your photo library.


5) To add the poll, tap the Emoji icon at the top-right corner. You can also access the stickers by swiping up from the bottom of the screen.


6) Write your question and give out the two options you want. Note that you can give only two options as this poll is binary as of now.


7) Tap Next to and hit Publish.


Once this poll is active, you can see how your followers are responding in real time. For this, go to your story and swipe up to see the list of viewers and how each one of them responded.

Virus-free. www.avast.com

Labels: ,

How to reopen tabs you’ve closed in Chrome, Firefox, Edge and Safari browser

It has happened with all of us. While just moving the cursor from tab to the other, you may accidentally shut one down. Or for that matter you may have closed the tab thinking you don't need it but later realised that you weren't done with it.

Here we tell you how to reopen the closed tab in three popular browsers: Chrome, Firefox and Safari and Edge:

Chrome


* In the open Chrome window, place the cursor on any open tab.


* Right click and you will see the second last option as Reopen closed tab.


* You can also use the keyboard shortcut Ctrl + Shift + T.


* For mobile version, tap on the menu button and tap Recent Tabs.


Firefox

* In the open Firefox window, place the cursor on any open tab.

* Right click and you will see the second last option as Undo Close Tab.

* You can also use the keyboard shortcut Ctrl + Shift + T.

* For mobile version, tap on the the address bar, tap the watch icon and here you will find the Recently Closed option.

Safari

* Go to History

* Tap on Reopen Last Closed Window

* You can also use the keyboard shortcut Cmd + Shift + T.

* For mobile version, you can tap the Tabs button and long-press the + button to open up a list of Recently Closed Tabs.


    Microsoft Edge


    * In the open Edge window, place the cursor on any open tab.


    * Right click and you will see the first option as Reopen closed tab.


    * You can also use the keyboard shortcut Ctrl + Shift + T.

    Virus-free. www.avast.com

    Labels: ,

    How to keep your digital files safe

    You need to use encryption and not just any kind — the kind that even the fastest computers or networks won't be able to crack.
    You need to use encryption and not just any kind — the kind that even the fastest computers or networks won't be able to crack.
    Despite the volume of traffic on the internet, anything you send online is susceptible to hacking. You need to use encryption and not just any kind — the kind that even the fastest computers or networks won't be able to crack. If you have something digital that needs protection, take a look at these tips:

    1. Encrypt your files while sharing them : Most of us don't think about this but it is always better to have a file encrypted before we share it with anyone. But the good news is, that this is really simple to do. Just head to a file transfer website that offers an encryption feature or you can opt for an email service that has the option of file encryption. Some options that you can try include www.senditonthenet.com, Sendinc.com, Tutanota.com, Protonmail.com, Encrypto, et al.


    2. Go for better encryption on cloud : For this, you can opt for a service called Boxcryptor that has support for most cloud storage providers. It also works across all popular desktop and mobile platforms.


    3. Keep your emails safer : A service called SendSafely will do this for you. It offers end-to-end encryption so that you can send emails in a more secure manner. You can even use it with services like Gmail and Outlook as an extension. The free version will give you about 50MB per month.


    4. Keep your information secret with this tool : There are times when we need to share information like ATM PIN or credit card details with a friend. We give the information because we have to but then get into the process of changing multiple passwords. You can avoid this by using a tool called PrivNote. It lets you send a note that gets deleted as soon as it's read. Furthermore, you can make it even more secure with a password. The service also has an option of sending you an email to notify that your note has been destroyed.


    5. Encrypt Gmail : If you use Gmail, you should be aware of a tool called CryptUp - which also comes as a Chrome extension. The tool can be used for end-to-end encryption of your Gmail inbox. When you add the extension, it will add a 'secure compose' button next to the regular compose button in Gmail. You can also encrypt your attachments using it.

    Virus-free. www.avast.com

    Labels: ,

    How to change default image and video formats in iOS 11

    With the release of iOS 11, there have a lot of features added to the iOS devices some of which you may like but some might just turn you off. The control centre for example has some people going gaga over the all new optimised look while some find it very inconvenient to use it. But one thing that people have found it rather annoying is the new camera setting. People who are into taking pictures and videos, it is rather a task to change the default setting of you camera, while the iOS 11 is still very new, we hope that future updates will solve that problem.

    If you want to change your camera settings from JPEG to High Efficiency Image File Format for images and from MP4 to HEVC format for videos, you will have to go to settings and make the changes, unlike other smartphones, Apple doesn't give that option in the camera app itself.

    1) Open the Settings app

    2) Open the camera app


    3) Tap on 'Formats'


    4) Once you've tapped on Formats, you will be redirected to a new page that'll give you two options to choose from; 'High Efficiency' and 'Most Compatible'.


    5) By default you camera will be set at 'High Efficiency', if you want to change that tap on 'Most Compatible', this will now allow you to take pictures and videos on JEPG and MP4 formats.


    6) But if you want to record 4k videos at 60fps you will not be able to change the default settings. However, changing it to the default setting will also allow you to take 4k videos but at 30fps.

    Virus-free. www.avast.com

    Labels: ,

    How to find and merge duplicate contacts in Google

    With almost 90% of the world's smartphones running Android, and with Gmail claiming a sizable chunk of the market share in the email sector, it's fair to say that billions of people around the planet are using Google Contacts as their primary address book.

    If you've been using the app for several years, your contact list is probably a mess. And although Google can't help you establish whether the contact details you hold for a person are still current, it can help you identify and either merge or remove duplicate entries.

    To find and merge duplicate contacts in Google, you just need to follow the step-by-step instructions we've detailed below:

    * Go to contacts.google.com and sign in using your Google Account credentials.

    * In the panel on the left-hand side of the screen, click on Duplicates.


    * Any duplicate contacts will be listed. The process uses the Name, Telephone Number, and Email address fields.


    * Click Merge All if you want to accept all Google's suggestions automatically.


    * Or mark the checkboxes next to the relevant entries and click Merge if you want to be more selective about your choices.


    * Your changes will be reflected across the Google ecosystem: on your Android phone, in Gmail, and in any other Google products.

    Virus-free. www.avast.com

    Labels: ,

    How to get Android 8.0 Oreo look on any smartphone

    How to get Android 8.0 Oreo look on any smartphone
    A few months ago, Google unveiled Android 8.0 Oreo and few OEMs have already started rolling it out under beta tests. While different OEMs have their own user interface layered on the Android OS, Pixel and Nexus smartphones carry pure Android UI, which is simple and clutter-free.

    Motorola and Nokia too use stock Android but that is not as vanilla as the ones found in Pixel and Nexus devices. If you are using one of the smartphones from the OEMs and you want to experience how Android Oreo feels like in your device, follow these steps. It's really easy.

    Step 1 - Go to 'Settings'

    Step 2 - Search for 'Unknown Sources' and allow the device to download apps from unknown sources.

    Step 3 - Go to GitHub page - https://github.com/amirzaidi/Launcher3/releases from the smartphone.

    Step 4 - Search for 'Rootless Pixel Launcher 2.1' and tap on 'Launcher3-aosp-debug.apk'

    Step 5 - Download the apk file.

    Step 6 - Once downloaded, tap on the home button to reach the home screen.

    Step 7 - Tap on 'Always' when a prompt is shown for the Launcher3 app.


    Step 8 - Generally you'll be done here. However, in some cases you would manually need to enter the settings page, search for the launcher and change it to Launcher3.


    Once done, you will see the same translucent app dock that can be scrolled up to access the drawer. The pill-shaped Google search button is also present at the top corner and swiping from left to right will open the personalised Google Now cards, similar to what we have seen in stock Android devices.
    LATEST COMMENTManjunath Yatnur, Hyderabad, 8 days ago
    I stead of some unverified software developed by some unknown guy. I wouldn''t take a risk to just get a "feel" of Android O, I would rather wait, even the current version of 7.1.1 is not that bad either.


    Furthermore, you can also see the app shortcuts and notification dots seen, features that come as a part of Android 8.0 Oreo.


    It is easy to uninstall the app as well. You can simply navigate to the 'Apps' section in the 'Settings' and tap on 'Uninstall' to remove the app. The home screen launcher will switch back to what was there as a default.

    Virus-free. www.avast.com

    Labels: ,

    How to Find Your Location History in Google Maps or iPhone

    You are likely aware that both Google and Apple (through its devices' hardware and software), keep track of your location in order to provide you with an ever-increasing variety of location-aware services. These include of course maps, custom routes, directions, and search, but they also include Facebook, review services such as Yelp, fitness apps, store brand apps, and more. 

    But not many people know that the location awareness of their portable devices and software extends to tracking and recording their location history, as well.

    In the case of Google, if you opt-in to "Places You've Been" in your account settings, your location history consists of a detailed and searchable, long-duration data file complete with a visible trail, organized by date and time. Apple provides you with much less information but does keep, and display at your request a record of your recently visited places, without the detailed trail feature that Google offers.

    Both Google and Apple provide these history files with plenty of assurances about privacy, and you may opt out of them completely, or, in the case of Google, even erase your entire location history.

    In my opinion, they are useful services that could help you, as long as you're aware of them have them opted into your comfort level. In some situations, location history could play an important role in legal or rescue situations.

    Google Location History How-To

    To see your location history in Google Maps, you must be logged into your master Google account, and you need to have been logged into your Google account on your smartphone or your laptop as you moved about locally or traveled in the past.

    After you are logged in to Google, go to www.google.com/maps/timeline  on a desktop or laptop web browser or via your smartphone, and you will be presented with a map-enabled search utility. In the location history control panel on the left, you may select date segments to see, in one through seven-day increments, or up to 14 or 30-day increments.

    After you select your date segments and ranges, you are shown your location and a travel trail of your positions for the time period. These tracks are zoomable and you can get a detailed history of your travels. You may also "delete history from this time period," or delete your entire history from the database. This is part of Google's effort to offer both transparency and user control when it comes to private location data.

    Apple iOS & iPhone Location History How-To

    Apple provides you with much less location history data and less detail. However, you can see some history. Here's how you get to your information:

    1. Go to the Settings icon on your iPhone.
    2. Scroll down and tap on Privacy.
    3. Tap on Location Services and scroll all the way to the bottom.
    4. Tap on System Services.
    5. Scroll all the way down to Frequent Locations.
    6. You'll find your location history at the bottom, with location names and dates.

    Apple stores a limited number of locations and does not provide precise travel tracks and timelines like Google. It provides location and date and an approximate position circle on a non-interactive (you can't pinch-to-zoom it) map. 

    Like so much technology today, location history can be harmful or helpful, depending on who is using it and how, and whether you understand and control it, and whether you opt in to what you want to have tracked (and opt out of what you don't want).


    Learning about location history on your device and how to view and control it is the first step.

    As a side note, now that you know where you've been do you know where your car is? If not, Google Maps will help you find it.


    Virus-free. www.avast.com

    Labels: , ,

    How to schedule an email on Gmail

    There are times when you are working and sending an email at that time may not feel right and later you might be unavailable or do not have access to internet. This is when the feature of scheduling an email on Gmail comes in to your rescue.
    There are times when you are working and sending an email at that time may not feel right and later you might ... Read More
    For most of us, Gmail is the primary email service that we rely on. There are times when you are working and sending an email at that time may not feel right and later you might be unavailable or do not have access to internet. This is when the feature of scheduling an email on Gmail comes in to your rescue. For this, you will need a tool called Boomerang -- compatible with both Chrome browser on desktop and your Android smartphone.

    Here is how it works:


    Scheduling Gmail on Chrome browser:

    * Add Boomerang as a Chrome extension from the Chrome webstore at www.chrome.google.com/webstore
    * Open Gmail or reload Gmail in case it is already open
    * Click on Compose and you will observe a new option at the bottom of the message box called Send later
    * Write a message in Gmail like you always do and then click Send Later menu to specify the time you want it sent
    * You can either do this by selecting the options given varying from 1 hour to 1 month or specify the exact time at which you want to send it
    * Authenticate the tool by permitting pop-ups
    * Hit send later and your email will be sent at that time

    Scheduling Gmail on Android smartphone:


    * Install Boomerang Mail app on your smartphone

    * Open app and select Gmail

    * Configure your Gmail id and password in the app

    * Compose the email in the app and tap on send later

    * Select the desired time and date

    * Hit send later and your email will be sent at that time


    Virus-free. www.avast.com

    Labels: ,

    How to hide the notch on the iPhone X


    The iPhone X notch houses a dot projector, IR sensors, the front facing camera, ambient light sensor, flood illuminator, a front speaker, microphone and proximity sensors.
    The iPhone X notch houses a dot projector, IR sensors, the front facing camera, ambient light sensor, flood il... Read More
    The iPhone X (ten, and not 'ex') is finally here after a long wait. And many users have embraced its new design and software changes. Some are even still trying to fool Apple's Face ID to get the phone to unlock (even a kid unlocked his mom's iPhoneX).

    There are others who are still not so cool with the wide notch that the company has added to their most expensive iPhone yet. And hearing all those complaints, Apple has allowed users to install apps that can hide the notch. By this we don't mean that the notch will magically disappear from your phone and give you extra, edge to edge display. But it only means that developers can shrink the screen from the top.

    Here is how you can 'hide' the notch on your iPhone X without forfeiting your warranty, and damaging your iPhone.


    To enable this, your phone need not be jail broken. These apps are official and can be installed by everyone.


    'Hide the Notch' is available on the App Store for free for all users, and the way that it works is simple. The app helps you select your wallpaper and adds an additional black strip in the exact dimensions of your iPhone X top bezel. Alternatively, you can even try out 'Notch Remover: Hide the notch', another free app.


    There are multiple apps that are turning up on the App Store that allow you to customise the wallpapers too. 'Notched' allows you add a colorful boundary to your wallpapers that curves around the notch to make it users believe that the wallpaper was custom made for the iPhone X.


    The iPhone X notch houses a dot projector, IR sensors, the front facing camera, ambient light sensor, flood illuminator, a front speaker, microphone and proximity sensors.

    Virus-free. www.avast.com

    Labels: , ,